Setup VM
This page describes on how to setup a VM for running a client.
Running the system inside a VM has the advantage of being able to quickly fix any problem which might hinder the presentation of the demos. For example, if a demo has a bug during cleanup and deletes data necessary for running other demos, using a VM provides a way to restore the system to a working state in matter of seconds. Even for small problems, like a change in configuration by one of the users, just resetting a VM is way faster than trying to find the problem. Overall this leads to a higher uptime of all demonstration machines.
In this setup a simple Linux installation with KVM is used. It would also be possible to use Xen. But this would only offer more options which we will not use anyway. Thus the simple setup is preferred.
Installation of the host OS
Prepare install medium
We are using Debian which can be downloaded from the official website: https://cdimage.debian.org/debian-cd/current/amd64/iso-cd/
Any other distribution (Ubuntu for example) would be suitable as well. In a development environment this can be installed inside a VM. If the installation target is a physical PC, a USB drive in conjunction with a tool like Etcher (https://www.balena.io/etcher/) can be used.
During OS install
- in grub something like
/dev/sdaor/dev/nvme0n1should be selected. - Username should be
elite - Software selection
- Debian desktop environment
- LXDE
- SSH server
- standard system utilities
- Additional note: In this example we are using "LXDE" as desktop environment. Both "LXDE" and "xfce" have a low memory footprint. One could also not install a desktop environment at all, but as they are already pretty lightweight, it doesn't make a huge difference
TODO: Partition the device, so the guest has direct block access?
Configuration of the host (post installation)
It is assumed the user is called elite.
The following steps take place in the terminal. Once you open it, you see a command promt in the style
user@hostname: $
If the last character is a $ it means you are a normal user.
If you see a # you are the root user and can potentially destroy the
current system. Be careful which commands you use! You are root after
using the su command. To go back to the normal user either press
CTRL+D or run exit.
Configure virtualization
-
Open terminal by opening the start menu and navigate to "System Tools -> LXTerminal". SSH can be used as well.
-
Run following commands
Debian
``` bash
echo 'export LIBVIRT_DEFAULT_URI="qemu:///system"' >> ~/.xsessionrc
su
apt update
apt install qemu-system libvirt-daemon-system virtinst bridge-utils
/sbin/adduser elite libvirt
Ubuntu
su
apt update
apt install qemu-system libvirt-daemon-system virtinst bridge-utils virt-viewer
adduser elite libvirt
echo 'export LIBVIRT_DEFAULT_URI="qemu:///system"' >> /etc/profile
setfacl -m u:libvirt-qemu:x /home/elite -
After a reboot, the user `elite is able to access the virtualization system.
Install virt-viewer 11
A newer version of virt-viewer has to be installed to make automatic USB redirection work. Download this file and run the following commands: virt-package.deb
su
export PATH=$PATH:/usr/local/sbin:/usr/sbin:/sbin
dpkg -i virt-package.deb
apt-get install -f
Configure network
For the network configuration either NAT or a bridge can be used. If using NAT the guest system is "invisible" to the other devices in the network and hidden behind the IP-address of the host. This could lead to issues if the guest system provides network services.
If using a bridge, the guest system is visible to all other devices like it would be a physical machine. This should increase compatibility if the guest provides network services.
Networking with NAT
Start the default network
virsh --connect=qemu:///system net-start default
virsh --connect=qemu:///system net-autostart default
If you run the system in a nested VM setup, you might need to adjust subnet for the assigned IP-addresses.
virsh --connect=qemu:///system net-edit default
Creating a VM
Requirements:
All of the following exports commands set environment variables to
change the behavior of the virt-install call. Adjust them according to
your needs.
#### CONFIG BEGIN #####
# Memory assigned to the vm. This example uses 90% of the available memory. A simple number in megabytes is also sufficient
export MEMORY_M=$(echo $(($(free -m | grep Mem: | awk '{print $2}') * 0.9)) | awk '{print int($1+0.5)}')
# Size of the disk image in gigabyte
export IMAGE_SIZE_G="100"
export IMAGE_PATH="win10.qcow2"
# Path to the virtio driver iso
export VIRTIO_ISO_PATH="virtio-win.iso"
# Path to the Windows iso file
export WIN_ISO_PATH="Win10_21H2_German_x64.iso"

# Network configuration. Delete the one you don't use
# NAT Network
export NETWORK_TYPE="default"
# Bridge Network
export NETWORK_TYPE="bridge=br0"

export VM_CORES=12
export VM_THREAD_PER_CORE=1

#### CONFIG END #####

export VM_NUM_CPUS=$((${VM_CORES}*${VM_THREAD_PER_CORE}))

virt-install --connect qemu:///system \
--virt-type kvm \
--name=windows10 \
--os-variant=win10 \
--vcpus ${VM_NUM_CPUS},sockets=1,cores=${VM_CORES},threads=${VM_THREAD_PER_CORE} \
--cpu host-passthrough \
--memory ${MEMORY_M} \
--features smm.state=on,kvm_hidden=on,hyperv_relaxed=on,hyperv_vapic=on,hyperv_spinlocks=on,hyperv_spinlocks_retries=8191 \
--clock hypervclock_present=yes \
--disk path=${IMAGE_PATH},size=${IMAGE_SIZE_G},format=qcow2,sparse=true,bus=virtio,cache=writethrough,discard=unmap,io=threads  \
--controller type=scsi,model=virtio-scsi \
--graphics spice \
--video model=qxl,vgamem=32768,ram=131072,vram=131072,heads=1 \
--channel spicevmc,target_type=virtio,name=com.redhat.spice.0 \
--channel unix,target_type=virtio,name=org.qemu.guest_agent.0 \
--network ${NETWORK_TYPE} \
--input type=tablet,bus=virtio \
--metadata title='Win10' \
--disk ${VIRTIO_ISO_PATH},device=cdrom \
--cdrom ${WIN_ISO_PATH}
A window with the VM should automatically open. If this is not the case or the window is closed by accident just run
virt-viewer -c qemu:///system
Closing the viewer window does not stop the VM.
Setup of Windows client
Notice: If you are using a nested VM-Setup the mouse might act strange in Windows. If that is the case just install using the keyboard only. After installing the virtio drivers, everything will work as expected.
-
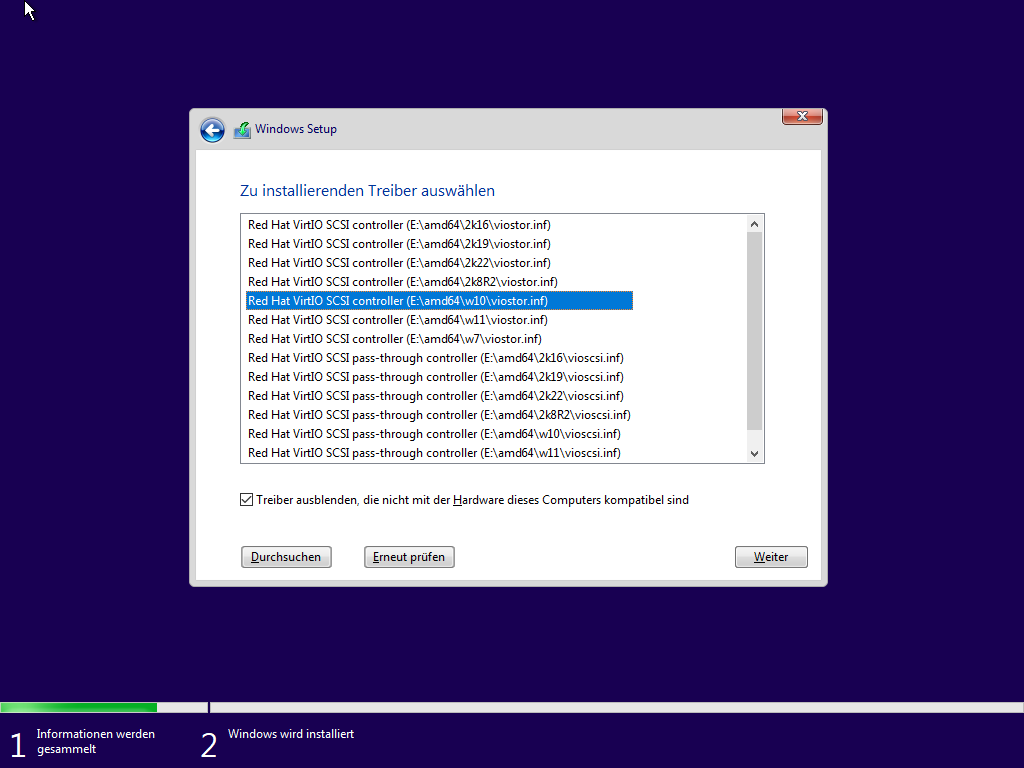
The installation doesn't differ from installing on a physical machine. Only during the partitioning it is necessary to load the virtio drivers from the mounted disk as seen below:
-
After the installation the VM can be started using the following command
virsh --connect qemu:///system start windows10 -
Once Windows is booted, navigate to the mounted virtio drive and run
virtio-win-guest-tools.exe. After installing those files higher resolutions and other features are available. Make sure you use at least version0.1.217. -
In the final step check the device manager for missing or corrupted drivers. If anything is wrong uninstall and reinstall them again.
Presenting the VM for end users
The application virt-viewer provides a "kiosk"-mode which can be used
to run a VM without the possibility of exiting!
virt-viewer -k --kiosk-quit=never
WARNING: By using this command you are not (easily) able to leave the
VM. To do that you'll need access to a terminal on the host. This can be
done by connecting via SSH or pressing "CTRL+ALT+F2" and logging in.
Then run killall virt-viewer. Switch back to the GUI by pressing
"CTRL+ALT+F7".
TODO: As we can see one could exit the VM by switching to a different tty. This can easily be disabled. But we need to see what else might need to be done.
USB devices
As long as the viewer is in the foreground, all newly attached USB devices are automatically forwarded to the VM.
Creating and restoring VM snapshots
A snapshot of a VM can be created with the following command
virsh snapshot-create-as --domain <VM name> --name <snapshot name>
This snapshot contains the current disk and memory state.
To restore a snapshot run the following command
virsh snapshot-revert --domain <VM name> --snapshotname <snapshot name>
A few seconds later the VM is ready to use again. If used on an offline VM, the VM boots in the specified snapshot.
This allows us to recover from any software related issue in a matter of seconds.
Tips and notes
These are just some random tips and notes one might find useful.
GUI for managing VMs
By using virt-manager VMs can be managed using a GUI. This includes
settings like the allocated memory, CPU cores and other hardware. By
using SSH other machines can be managed as well.
Changing CPU cores within GUI
When changing CPU cores the Manually set CPU topology should be used.
Because virt-manager is only setting the Sockets higher and Windows 10
Pro is just supporting max 2 Sockets. Sockets should be set on 1
and just the Cores should be raised. With the new update (01.08.2022)
within the install script were using 12 Cores
SSH Keys
If you connect to a machine with ssh name@host you need to enter your
password every time. This can be prevented by appending your public key
to the file ~/.ssh/authorized_hosts. On Linux ssh-copy-id user@host
can be used to copy it automatically.
"Better" Shell
To make running commands easier another shell like zsh can be used.
This shell (with the correct config) allows to complete many commands by
using TAB. For example completing the names of existing snapshots and
VMs. In addition it allows for editing multi line commands.
su -c "apt install zsh"
wget -O ~/.zshrc https://git.grml.org/f/grml-etc-core/etc/zsh/zshrc
chsh -s /bin/zsh
ELITE Workstations (AlderLake CPU specialities)
Graphics and Performance
The workstations we currently use have the Intel AlderLake processors. They don't work out of the box with debian! In order to have it work we need to update the kernel from the backports. Just run the following commands and reboot.
su
echo "deb http://deb.debian.org/debian bullseye-backports main contrib non-free" >> /etc/apt/sources.list
apt update
apt full-upgrade
apt -t bullseye-backports install linux-image-amd64
Windows VM boot problem after HyperV/WSL/Docker install
The demo workstations we have seem to need special CPU configurations
for KVM. Otherwise they are stuck in the boot loop after using nested
virtualization in the windows client VMs (after installation of hyperv,
WSL or docker). These settings can also be set in the virt-install
command above but is not tested in this way.
The most important config setting is following:
<cpu mode="custom" match="exact" check="partial">
  <model fallback="allow">IvyBridge</model>
  <feature policy="disable" name="hypervisor"/>
  <feature policy="require" name="vmx"/>
</cpu>
Here is the complete XML config: kvm_config_example.xml
Lockdown client
Disable tty with ctrl+alt+F#:
echo "setxkbmap -option srvrkeys:none" >> ~/.xsessionrc
Furthermore we need to lockdown the desktop environment. We can either use LXDE or use i3. Using i3 has the advantage that we still have a "working" DE for debugging. If LXDE is used for lockdown one should install xfce or a similar DE to use for troubleshooting.
Disable power controls (still needs testing):
echo -en "HandlePowerKey=ignore\nHandleSuspendKey=ignore\HandleHibernateKey=ignore" >> /etc/systemd/logind.conf
LXDE
Change ~/.config/openbox/lxde-rc.xml to the following content to
disable all shortcuts:
<?xml version="1.0" encoding="UTF-8"?>
<!-- Do not edit this file, it will be overwritten on install.
Copy the file to $HOME/.config/openbox/ instead. -->
<openbox_config xmlns='http://openbox.org/3.4/rc'>
<resistance>
<strength>10</strength>
<screen_edge_strength>20</screen_edge_strength>
</resistance>
<focus>
<focusNew>yes</focusNew>
<!-- always try to focus new windows when they appear. other rules do
apply -->
<followMouse>no</followMouse>
<!-- move focus to a window when you move the mouse into it -->
<focusLast>yes</focusLast>
<!-- focus the last used window when changing desktops, instead of the one
under the mouse pointer. when followMouse is enabled -->
<underMouse>no</underMouse>
<!-- move focus under the mouse, even when the mouse is not moving -->
<focusDelay>200</focusDelay>
<!-- when followMouse is enabled, the mouse must be inside the window for
this many milliseconds (1000 = 1 sec) before moving focus to it -->
<raiseOnFocus>no</raiseOnFocus>
</focus>
<!-- when followMouse is enabled, and a window is given focus by moving the
mouse into it, also raise the window -->
<placement>
<policy>Smart</policy>
<!-- 'Smart' or 'UnderMouse' -->
<center>yes</center>
<!-- whether to place windows in the center of the free area found or
the top left corner -->
<monitor>Any</monitor>
</placement>
<!-- with Smart placement on a multi-monitor system, try to place new windows
on: 'Any' - any monitor, 'Mouse' - where the mouse is, 'Active' - where
the active window is -->
<theme>
<name>Onyx</name>
<titleLayout>NLIMC</titleLayout>
<!-- available characters are NDSLIMC, each can occur at most once.
N: window icon
L: window label (AKA title).
I: iconify
M: maximize
C: close
S: shade (roll up/down)
D: omnipresent (on all desktops).
-->
<keepBorder>yes</keepBorder>
<animateIconify>yes</animateIconify>
<font place='ActiveWindow'>
<name>sans</name>
<size>10</size>
<!-- font size in points -->
<weight>bold</weight>
<!-- 'bold' or 'normal' -->
<slant>normal</slant>
</font>
<!-- 'italic' or 'normal' -->
<font place='InactiveWindow'>
<name>sans</name>
<size>10</size>
<!-- font size in points -->
<weight>bold</weight>
<!-- 'bold' or 'normal' -->
<slant>normal</slant>
</font>
<!-- 'italic' or 'normal' -->
<font place='MenuHeader'>
<name>sans</name>
<size>10</size>
<!-- font size in points -->
<weight>normal</weight>
<!-- 'bold' or 'normal' -->
<slant>normal</slant>
</font>
<!-- 'italic' or 'normal' -->
<font place='MenuItem'>
<name>sans</name>
<size>10</size>
<!-- font size in points -->
<weight>normal</weight>
<!-- 'bold' or 'normal' -->
<slant>normal</slant>
</font>
<!-- 'italic' or 'normal' -->
<font place='OnScreenDisplay'>
<name>sans</name>
<size>10</size>
<!-- font size in points -->
<weight>bold</weight>
<!-- 'bold' or 'normal' -->
<slant>normal</slant>
</font>
</theme>
<!-- 'italic' or 'normal' -->
<desktops>
<!-- this stuff is only used at startup, pagers allow you to change them
during a session
these are default values to use when other ones are not already set
by other applications, or saved in your session
use obconf if you want to change these without having to log out
and back in -->
<number>2</number>
<firstdesk>1</firstdesk>
<names/>
<!-- set names up here if you want to, like this:
<name>desktop 1</name>
<name>desktop 2</name>
-->
<popupTime>875</popupTime>
</desktops>
<!-- The number of milliseconds to show the popup for when switching
desktops. Set this to 0 to disable the popup. -->
<resize>
<drawContents>yes</drawContents>
<popupShow>Nonpixel</popupShow>
<!-- 'Always', 'Never', or 'Nonpixel' (xterms and such) -->
<popupPosition>Center</popupPosition>
<!-- 'Center', 'Top', or 'Fixed' -->
<popupFixedPosition>
<!-- these are used if popupPosition is set to 'Fixed' -->
<x>10</x>
<!-- positive number for distance from left edge, negative number for
distance from right edge, or 'Center' -->
<y>10</y>
</popupFixedPosition>
</resize>
<!-- You can reserve a portion of your screen where windows will not cover when
they are maximized, or when they are initially placed.
Many programs reserve space automatically, but you can use this in other
cases. -->
<margins>
<top>0</top>
<bottom>0</bottom>
<left>0</left>
<right>0</right>
</margins>
<dock>
<position>TopLeft</position>
<!-- (Top|Bottom)(Left|Right|)|Top|Bottom|Left|Right|Floating -->
<floatingX>0</floatingX>
<floatingY>0</floatingY>
<noStrut>no</noStrut>
<stacking>Above</stacking>
<!-- 'Above', 'Normal', or 'Below' -->
<direction>Vertical</direction>
<!-- 'Vertical' or 'Horizontal' -->
<autoHide>no</autoHide>
<hideDelay>300</hideDelay>
<!-- in milliseconds (1000 = 1 second) -->
<showDelay>300</showDelay>
<!-- in milliseconds (1000 = 1 second) -->
<moveButton>Middle</moveButton>
</dock>
<!-- 'Left', 'Middle', 'Right' -->
<keyboard>
<chainQuitKey>C-g</chainQuitKey>
</keyboard>
<mouse>
<dragThreshold>8</dragThreshold>
<!-- number of pixels the mouse must move before a drag begins -->
<doubleClickTime>200</doubleClickTime>
<!-- in milliseconds (1000 = 1 second) -->
<screenEdgeWarpTime>400</screenEdgeWarpTime>
<!-- Time before changing desktops when the pointer touches the edge of the
screen while moving a window, in milliseconds (1000 = 1 second).
Set this to 0 to disable warping -->
<context name='Frame'>
<mousebind button='A-Left' action='Press'>
<action name='Focus'/>
<action name='Raise'/>
</mousebind>
<mousebind button='A-Left' action='Click'>
<action name='Unshade'/>
</mousebind>
<mousebind button='A-Left' action='Drag'>
<action name='Move'/>
</mousebind>
<mousebind button='A-Right' action='Press'>
<action name='Focus'/>
<action name='Raise'/>
<action name='Unshade'/>
</mousebind>
<mousebind button='A-Right' action='Drag'>
<action name='Resize'/>
</mousebind>
<mousebind button='A-Middle' action='Press'>
<action name='Lower'/>
<action name='FocusToBottom'/>
<action name='Unfocus'/>
</mousebind>
<mousebind button='A-Up' action='Click'>
<action name='DesktopPrevious'/>
</mousebind>
<mousebind button='A-Down' action='Click'>
<action name='DesktopNext'/>
</mousebind>
<mousebind button='C-A-Up' action='Click'>
<action name='DesktopPrevious'/>
</mousebind>
<mousebind button='C-A-Down' action='Click'>
<action name='DesktopNext'/>
</mousebind>
<mousebind button='A-S-Up' action='Click'>
<action name='SendToDesktopPrevious'/>
</mousebind>
<mousebind button='A-S-Down' action='Click'>
<action name='SendToDesktopNext'/>
</mousebind>
</context>
<context name='Titlebar'>
<mousebind button='Left' action='Press'>
<action name='Focus'/>
<action name='Raise'/>
</mousebind>
<mousebind button='Left' action='Drag'>
<action name='Move'/>
</mousebind>
<mousebind button='Left' action='DoubleClick'>
<action name='ToggleMaximizeFull'/>
</mousebind>
<mousebind button='Middle' action='Press'>
<action name='Lower'/>
<action name='FocusToBottom'/>
<action name='Unfocus'/>
</mousebind>
<mousebind button='Up' action='Click'>
<action name='Shade'/>
<action name='FocusToBottom'/>
<action name='Unfocus'/>
<action name='Lower'/>
</mousebind>
<mousebind button='Down' action='Click'>
<action name='Unshade'/>
<action name='Raise'/>
</mousebind>
<mousebind button='Right' action='Press'>
<action name='Focus'/>
<action name='Raise'/>
<action name='ShowMenu'>
<menu>client-menu</menu>
</action>
</mousebind>
</context>
<context name='Top'>
<mousebind button='Left' action='Press'>
<action name='Focus'/>
<action name='Raise'/>
<action name='Unshade'/>
</mousebind>
<mousebind button='Left' action='Drag'>
<action name='Resize'>
<edge>top</edge>
</action>
</mousebind>
</context>
<context name='Left'>
<mousebind button='Left' action='Press'>
<action name='Focus'/>
<action name='Raise'/>
</mousebind>
<mousebind button='Left' action='Drag'>
<action name='Resize'>
<edge>left</edge>
</action>
</mousebind>
</context>
<context name='Right'>
<mousebind button='Left' action='Press'>
<action name='Focus'/>
<action name='Raise'/>
</mousebind>
<mousebind button='Left' action='Drag'>
<action name='Resize'>
<edge>right</edge>
</action>
</mousebind>
</context>
<context name='Bottom'>
<mousebind button='Left' action='Press'>
<action name='Focus'/>
<action name='Raise'/>
</mousebind>
<mousebind button='Left' action='Drag'>
<action name='Resize'>
<edge>bottom</edge>
</action>
</mousebind>
<mousebind button='Middle' action='Press'>
<action name='Lower'/>
<action name='FocusToBottom'/>
<action name='Unfocus'/>
</mousebind>
<mousebind button='Right' action='Press'>
<action name='Focus'/>
<action name='Raise'/>
<action name='ShowMenu'>
<menu>client-menu</menu>
</action>
</mousebind>
</context>
<context name='BLCorner'>
<mousebind button='Left' action='Press'>
<action name='Focus'/>
<action name='Raise'/>
</mousebind>
<mousebind button='Left' action='Drag'>
<action name='Resize'/>
</mousebind>
</context>
<context name='BRCorner'>
<mousebind button='Left' action='Press'>
<action name='Focus'/>
<action name='Raise'/>
</mousebind>
<mousebind button='Left' action='Drag'>
<action name='Resize'/>
</mousebind>
</context>
<context name='TLCorner'>
<mousebind button='Left' action='Press'>
<action name='Focus'/>
<action name='Raise'/>
<action name='Unshade'/>
</mousebind>
<mousebind button='Left' action='Drag'>
<action name='Resize'/>
</mousebind>
</context>
<context name='TRCorner'>
<mousebind button='Left' action='Press'>
<action name='Focus'/>
<action name='Raise'/>
<action name='Unshade'/>
</mousebind>
<mousebind button='Left' action='Drag'>
<action name='Resize'/>
</mousebind>
</context>
<context name='Client'>
<mousebind button='Left' action='Press'>
<action name='Focus'/>
<action name='Raise'/>
</mousebind>
<mousebind button='Middle' action='Press'>
<action name='Focus'/>
<action name='Raise'/>
</mousebind>
<mousebind button='Right' action='Press'>
<action name='Focus'/>
<action name='Raise'/>
</mousebind>
</context>
<context name='Icon'>
<mousebind button='Left' action='Press'>
<action name='Focus'/>
<action name='Raise'/>
<action name='Unshade'/>
<action name='ShowMenu'>
<menu>client-menu</menu>
</action>
</mousebind>
<mousebind button='Right' action='Press'>
<action name='Focus'/>
<action name='Raise'/>
<action name='ShowMenu'>
<menu>client-menu</menu>
</action>
</mousebind>
</context>
<context name='AllDesktops'>
<mousebind button='Left' action='Press'>
<action name='Focus'/>
<action name='Raise'/>
<action name='Unshade'/>
</mousebind>
<mousebind button='Left' action='Click'>
<action name='ToggleOmnipresent'/>
</mousebind>
</context>
<context name='Shade'>
<mousebind button='Left' action='Press'>
<action name='Focus'/>
<action name='Raise'/>
</mousebind>
<mousebind button='Left' action='Click'>
<action name='ToggleShade'/>
</mousebind>
</context>
<context name='Iconify'>
<mousebind button='Left' action='Press'>
<action name='Focus'/>
<action name='Raise'/>
</mousebind>
<mousebind button='Left' action='Click'>
<action name='Iconify'/>
</mousebind>
</context>
<context name='Maximize'>
<mousebind button='Left' action='Press'>
<action name='Focus'/>
<action name='Raise'/>
<action name='Unshade'/>
</mousebind>
<mousebind button='Middle' action='Press'>
<action name='Focus'/>
<action name='Raise'/>
<action name='Unshade'/>
</mousebind>
<mousebind button='Right' action='Press'>
<action name='Focus'/>
<action name='Raise'/>
<action name='Unshade'/>
</mousebind>
<mousebind button='Left' action='Click'>
<action name='ToggleMaximizeFull'/>
</mousebind>
<mousebind button='Middle' action='Click'>
<action name='ToggleMaximizeVert'/>
</mousebind>
<mousebind button='Right' action='Click'>
<action name='ToggleMaximizeHorz'/>
</mousebind>
</context>
<context name='Close'>
<mousebind button='Left' action='Press'>
<action name='Focus'/>
<action name='Raise'/>
<action name='Unshade'/>
</mousebind>
<mousebind button='Left' action='Click'>
<action name='Close'/>
</mousebind>
</context>
<context name='Desktop'>
<mousebind button='Up' action='Click'>
<action name='DesktopPrevious'/>
</mousebind>
<mousebind button='Down' action='Click'>
<action name='DesktopNext'/>
</mousebind>
<mousebind button='A-Up' action='Click'>
<action name='DesktopPrevious'/>
</mousebind>
<mousebind button='A-Down' action='Click'>
<action name='DesktopNext'/>
</mousebind>
<mousebind button='C-A-Up' action='Click'>
<action name='DesktopPrevious'/>
</mousebind>
<mousebind button='C-A-Down' action='Click'>
<action name='DesktopNext'/>
</mousebind>
<mousebind button='Left' action='Press'>
<action name='Focus'/>
<action name='Raise'/>
</mousebind>
<mousebind button='Right' action='Press'>
<action name='Focus'/>
<action name='Raise'/>
</mousebind>
</context>
<context name='Root'>
<!-- Menus -->
<mousebind button='Middle' action='Press'>
<action name='ShowMenu'>
<menu>client-list-combined-menu</menu>
</action>
</mousebind>
<mousebind button='Right' action='Press'>
<action name='ShowMenu'>
<menu>root-menu</menu>
</action>
</mousebind>
</context>
<context name='MoveResize'>
<mousebind button='Up' action='Click'>
<action name='DesktopPrevious'/>
</mousebind>
<mousebind button='Down' action='Click'>
<action name='DesktopNext'/>
</mousebind>
<mousebind button='A-Up' action='Click'>
<action name='DesktopPrevious'/>
</mousebind>
<mousebind button='A-Down' action='Click'>
<action name='DesktopNext'/>
</mousebind>
</context>
</mouse>
<menu>
<!-- default menu file (or custom one in $HOME/.config/openbox/) -->
<file>/usr/share/lxde/openbox/menu.xml</file>
<hideDelay>200</hideDelay>
<!-- if a press-release lasts longer than this setting (in milliseconds), the
menu is hidden again -->
<middle>no</middle>
<!-- center submenus vertically about the parent entry -->
<submenuShowDelay>100</submenuShowDelay>
<!-- this one is easy, time to delay before showing a submenu after hovering
over the parent entry -->
<applicationIcons>yes</applicationIcons>
<!-- controls if icons appear in the client-list-(combined-)menu -->
<manageDesktops>yes</manageDesktops>
</menu>
<!-- show the manage desktops section in the client-list-(combined-)menu -->
<applications/>
</openbox_config>
Then add the vm to the lxde autostart in
~/.config/autostart/vm.desktop:
[Desktop Entry]

Type=Application

Exec=bash -c "virsh start windows10 && virt-viewer -k --hotkeys=release-cursor=F13 windows10"
i3
Install i3 with `apt install i3` and change `~/.config/i3/config` to:

``` config
exec virsh start windows10
exec sleep 10 && virt-viewer -k --hotkeys=release-cursor=F13 windows10
Then change the login session to i3.